Authors: Brishan Kalyan, Levis Sirikwa, Eligio Maure
4.7. Data retrieval#
4.7.1. NASA OceanColor Web#
As mentioned above, NASA provides different Search and Download Methods (accessed on 20 November 2022) detailed in their website. We will provide a few examples of practical ways to search and download the data based on the need.
4.7.2. Setting up Wget on Windows#
Windows binaries for Wget are available from this link.

Fig. 4.11 The login credential information that should be in the .netrc file in your home directory. The .netrc and .urs_cookies files in the home directory, you need to ensure that the ‘file type’ of the .netrc file is “NETRC file” and not a text file.#
4.7.3. File Search and Download#
4.7.3.1. File Search API#
The search API locates publicly available data and returns a list of filenames matching the search criteria. The file search API is practical for data with levels higher than level 2 as most API outputs are level 3 data provided as global images, this is due to the file search API not being able to filter by geolocation. This capability is provided by the Level 1&2 Browser or Level 3 Browser (discussed next). This help page provides detailed information of the search options that can be passed to the API.
The API also offers file search via command line interface (CLI) or programming language like Python. Below we introduce two examples of data searching through CLI and Python with following options:
MODIS-Aqua (sensor_id=7 or sensor=aqua)
Level-3 binned data (dtid=1042 or dtype=L3b)
Chlorophyll product suite (suite_id=CHL)
Date range: start (sdate=2021-10-01 00:00:00)
Date range: end (edate=2021-10-31 23:59:59)
8-Day composite period (period=8D)
Non-extracted products (subType=1)
Include full url in search result (addurl=1)
Return results as a test file listing (results_as_file=1)
4.7.3.2. File Search with CLI#
wget -q --post-data="results_as_file=1&sensor_id=7&dtid=1042&suite_id=CHL&sdate=2022-10-01 00:00:00&edate=2022-10-31 23:59:59&subType=1&addurl=1&period=8D" -O - https://oceandata.sci.gsfc.nasa.gov/api/file_search
The above command can be run in the CLI with GNU Wget installed. Wget comes pre-installed in most Unix systems. But in Windows we might need to manually install it. The post search returns six getfile URLs of MODIS-Aqua 8-day CHL data.
https://oceandata.sci.gsfc.nasa.gov/cgi/getfile/A20212812021288.L3b_8D_CHL.nc
https://oceandata.sci.gsfc.nasa.gov/cgi/getfile/A20212892021296.L3b_8D_CHL.nc
https://oceandata.sci.gsfc.nasa.gov/cgi/getfile/A20212972021304.L3b_8D_CHL.nc
https://oceandata.sci.gsfc.nasa.gov/cgi/getfile/AQUA_MODIS.20211008_20211015.L3b.8D.CHL.nc
https://oceandata.sci.gsfc.nasa.gov/cgi/getfile/AQUA_MODIS.20211016_20211023.L3b.8D.CHL.nc
https://oceandata.sci.gsfc.nasa.gov/cgi/getfile/AQUA_MODIS.20211024_20211031.L3b.8D.CHL.nc
Note the different filenames. As of October 2022, the OB.DAAC was performing data reprocessing (R2022) of all its satellite missions including non-NASA missions that are supported. This reprocessing also introduces a change in the file naming convention. So the URL with filename A20212812021288.L3b_8D_CHL.nc corresponds to past naming convention while AQUA_MODIS.20211008_20211015.L3b.8D.CHL.nc represents the newly introduced naming convention that, among others, replaced “A” with “AQUA_MODIS” at the beginning of the filename. So as of now, NASA still keeps both data files with the current and previous naming convention.
As for the output of the Wget, the information printed in the CLI can be
redirected to a file. When doing so, the output of the CLI is saved in the
indicated filename. This can be achieved by adding the “>” sign followed by the
filename at the end of the Wget command as follows:
wget -q --post-data="results_as_file=1&sensor_id=7&dtid=1042&suite_id=CHL&sdate=2022-10-01 00:00:00&edate=2022-10-31 23:59:59&subType=1&addurl=1&period=8D" -O - https://oceandata.sci.gsfc.nasa.gov/api/file_search > manifest.txt
The obtained URLs can be downloaded one by one which is feasible for a few URLs. In case of a large number of URLs manual download can easily become overwhelming. Wget can again come to the rescue as we will discuss shortly.
Prior to using Wget for the downloads, it is necessary to configure the
username and password for authentication following the recommended
method of using a
.netrc (Fig. 4.11). This username and password is the same used for
registration for the NASA and JAXA portals. This .netrc file is saved in the
home directory with information of your credentials associated with a given
host. The same file can be used to save as many different credentials as needed.
Further instructions are provided in the
Search and Download Methods.
Once the .netrc file is created we can proceed to download the data by issuing
the following command:
Q: What is the command that suppose to go here?
The above command also assumes that the .urs_cookies file exists in the home directory (~/).
4.7.3.3. File Search with Python#
Besides using Wget to search and download, the Python
requests package can also be
used for the same end. The steps are as follows:
In a
iPythonsession,import requeststo post requests on the webDefine the search string as in the above
WgetexampleIssue a
.post()operation that returns the information requested
import requests

query = 'https://oceandata.sci.gsfc.nasa.gov/api/file_search?' \
        'sensor=aqua' \
        '&dtype=L3b' \
        '&suite_id=CHL' \
        '&sdate=2021-10-01 00:00:00' \
        '&edate=2021-10-31 23:59:59' \
        '&subType=1' \
        '&addurl=1' \
        '&period=8D' \
        '&format=txt'
r = requests.post(query)
After posting our request to OB.DAAC, we get a Response object and we assign
this object to a variable r. The response object contains a lot of information
associated with our post. Since we asked the OB.DAAC to return the information
in the form of text (format=txt), we can inspect the text object contained in
r. By doing so, we obtain the information of the returned URLs as in the case
of Wget.
print(r.text)
https://oceandata.sci.gsfc.nasa.gov/cgi/getfile/A20212812021288.L3b_8D_CHL.nc
https://oceandata.sci.gsfc.nasa.gov/cgi/getfile/A20212892021296.L3b_8D_CHL.nc
https://oceandata.sci.gsfc.nasa.gov/cgi/getfile/A20212972021304.L3b_8D_CHL.nc
https://oceandata.sci.gsfc.nasa.gov/cgi/getfile/AQUA_MODIS.20211008_20211015.L3b.8D.CHL.nc
https://oceandata.sci.gsfc.nasa.gov/cgi/getfile/AQUA_MODIS.20211016_20211023.L3b.8D.CHL.nc
https://oceandata.sci.gsfc.nasa.gov/cgi/getfile/AQUA_MODIS.20211024_20211031.L3b.8D.CHL.nc
In the above search we posted a query string with search parameters concatenated
by the "&" character. In requests these options or search parameters can also
be passed in the form of a Python dictionary of key=value pairs in which case
the result will also be the same as in posting a single query string.
url = 'https://oceandata.sci.gsfc.nasa.gov/api/file_search'
params = {
   'sensor': 'aqua', 'dtype': 'L3b', 'suite_id': 'CHL',
   'sdate': '2021-10-01 00:00:00', 'edate': '2021-10-31 23:59:59',
   'subType': 1, 'addurl': 1, 'period': '8D', 'format': 'txt'
}
r = requests.post(url, params=params)
Note that instead of using numbers for the sensor_id and dtid these keys
were replaced by the corresponding sensor and dtype keys, and their
corresponding values as discussed in the
Search and Download Methods
page of the OceanColor Web.
To download the data we can issue a .get() operation with each of the URLs
obtained in the previous part. The Python built-in Path module from
pathlib library, an
object-oriented module for filesystem paths, can be used to extract the filename
from the URL. This module makes it easy to seamlessly handle filesystem paths
without the need to worry about subtle differences like forward or backward
slash in Unix or Windows operating systems. Beyond that, the many use cases are
discussed on the dedicated
documentation page.
from pathlib import Path

urls = r.text.splitlines()
file = Path(urls[-1]).name
The .splitlines() method splits a string into a list of strings. The line
splitting occurs at the line breaks defined by the newline character '\n'. The
-1 indicates that we are selecting the last URL in the list. We then use
.get() to request the data of this file from the OB.DAAC.
r = requests.get(urls[-1], stream=True, auth=('user', 'passwd'))
with open(file, 'wb') as fid:
     for chunk in r.iter_content(chunk_size=1024):
         fd.write(chunk)
Following the download request, we open a local file with the same name as the
provider filename. We use the context the manager with which makes sure that the
file is gracefully closed after the download operation is completed. The
requests module is also capable of automatically retrieving the credentials
from the .netrc file if it exists. This behaviour can be overridden by
providing the credentials as a tuple of username and password. The
.iter_content() iterates through the received data until the data is totally
consumed. The chunk_size can be freely adjusted to another value that best
fits the use cases.
4.7.4. File Browsing, ordering and download#
4.7.4.1. The Level 1&2 Browser#
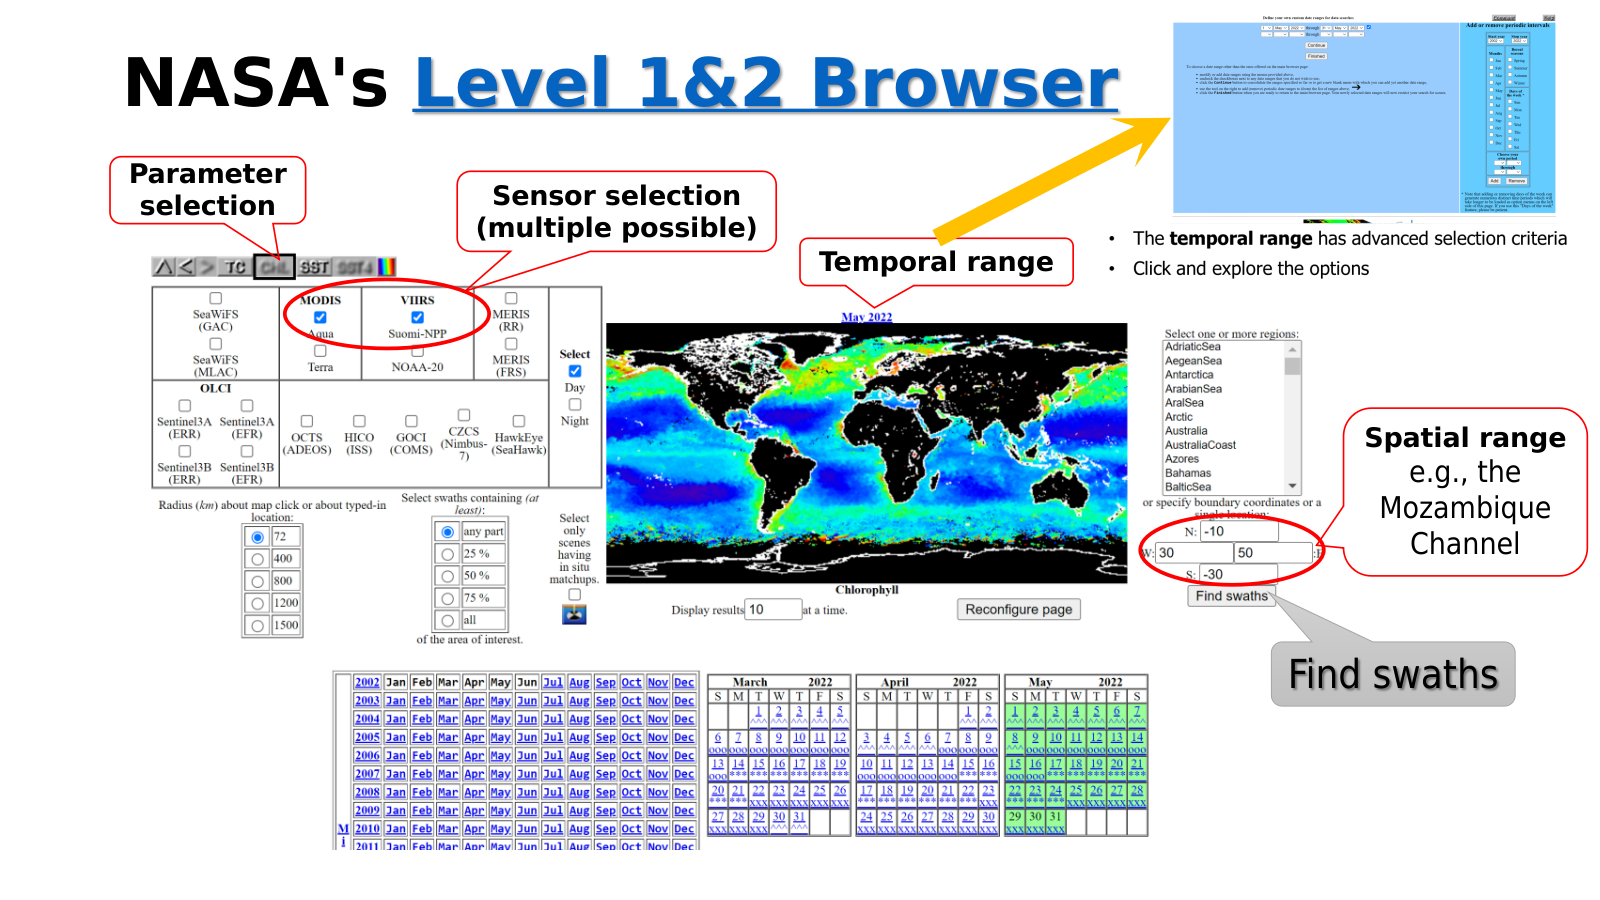
The figure below (Figure 4.12) shows the top level of the ocean colour level 1 and 2 browser. This page allows users to specify their search criteria and launch the search for level 1 and 2 scenes. In the example that follows we discuss the discovery of level 2 scenes. Prior to that, we briefly introduce the various browse options that this page offers.

Fig. 4.12 NASA Level 1&2 Browser.#
Parameter selection
Allow the selection of the search and display parameter in the global map. The selected parameter is annotated below the global map. With these buttons we can choose:
TC - quasi-True-Colour imagery
CHL - view chlorophyll data and search the suite of ocean colour parameters
SST - sea surface temperature data, either daytime or nighttime or both
Sensor selection
Multiple options are possible. For sensors like SeaWiFS, MERIS, Sentinel 3A and 3B data types are also selectable. These options are GAC (4 km): Global Area Coverage and MLAC (1 km): Merged-Local Area Coverage for SeaWiFS, RR (1.2 km): Reduced Resolution and FRS (300 m): Full Resolution for MERIS, ERR (1.2 km): Reduced Resolution and EFR (300 m): Full Resolution for Sentinel 3A and 3B.
Search radius
Defines the buffer region around a given geographical (latitude/longitude) point of interest (POI) selected on the map. Scenes covering the portion of Earth’s surface within this radius in kilometres will be selected.
Swath coverage
Defines the fraction of the area of interest (AOI) that should be contained in any given swath. This can be useful in selecting scenes that are centred (across track) on a particular location. By choosing “all”, for instance, and selecting a radius of 1500 kilometres to MLAC scenes that are centred (in the across track sense) on the AOI can return scenes centred on the POI.
Temporal range
One or more time intervals can be selected in the advanced options of this hyperlink text on top of the global map. The time period indicated on the global map corresponds to the composite period of the global map product being shown.
Bounding box
We can define the AOI based on POI as in the case of the Search radius by entering a single latitude (in the “N:” or “S:” box) or a single longitude (in the “W:” or the “:E” box). The AOI would require entering all four values for the bounding box. Latitudes and longitudes are entered in decimal degrees, positive east and north, negative west and south.
In-situ matchups
Return scenes with coincident in-situ matchups in the AOI. The matchup location will be displayed in the resultant browse scenes.
Reconfigure
While some options automatically reconfigure (refresh) the browser, for options like sensor or AOI, for instance, after all desired options are set, we need to push the reconfigure button to refresh the browser to the new selected/entered parameters.
Find swaths
Once all options are entered and the browser has been refreshed, we can proceed with the find swaths button. This will move to a different page that displays the results of the scenes found based on our search criteria. Clicking on this button without specifying any geographical constraints will return all available scenes for the whole world for the current time period.
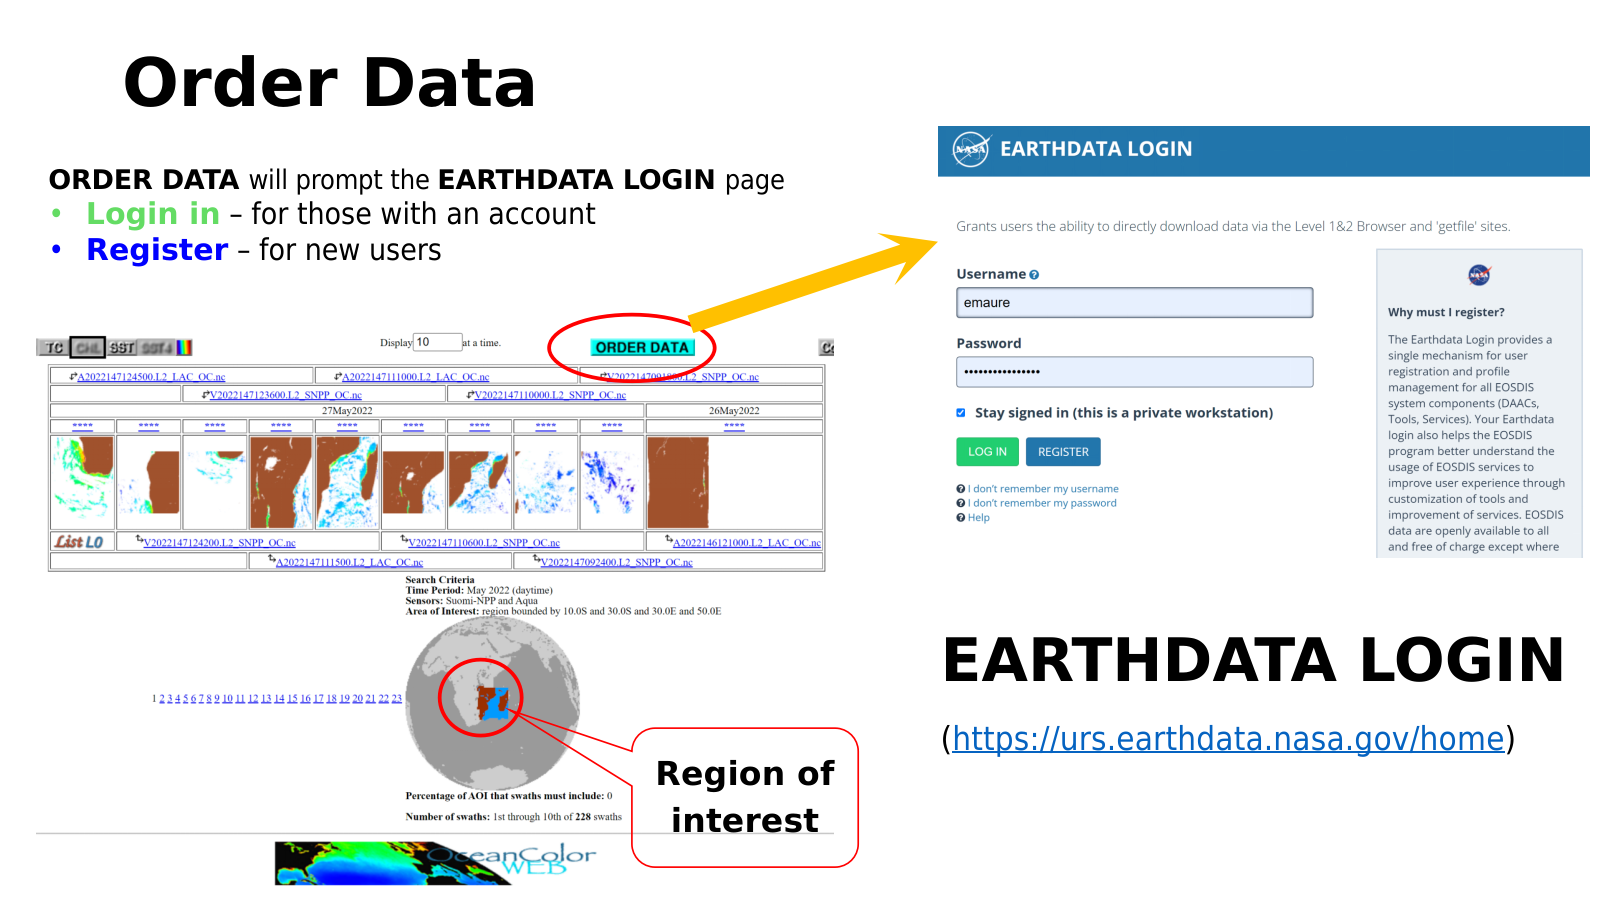
We find the scenes for the search example with options shown in the Figure 4.12 above, MODIS-Aqua and VIIRS-SNPP for the sensors, CHL (OC) for the parameter, May 2022 for the temporal range, and Mozambique channel for the AOI. The result of the find swaths is shown in the Figure 4.13 below.

Fig. 4.13 Data ordering.#
Data ordering
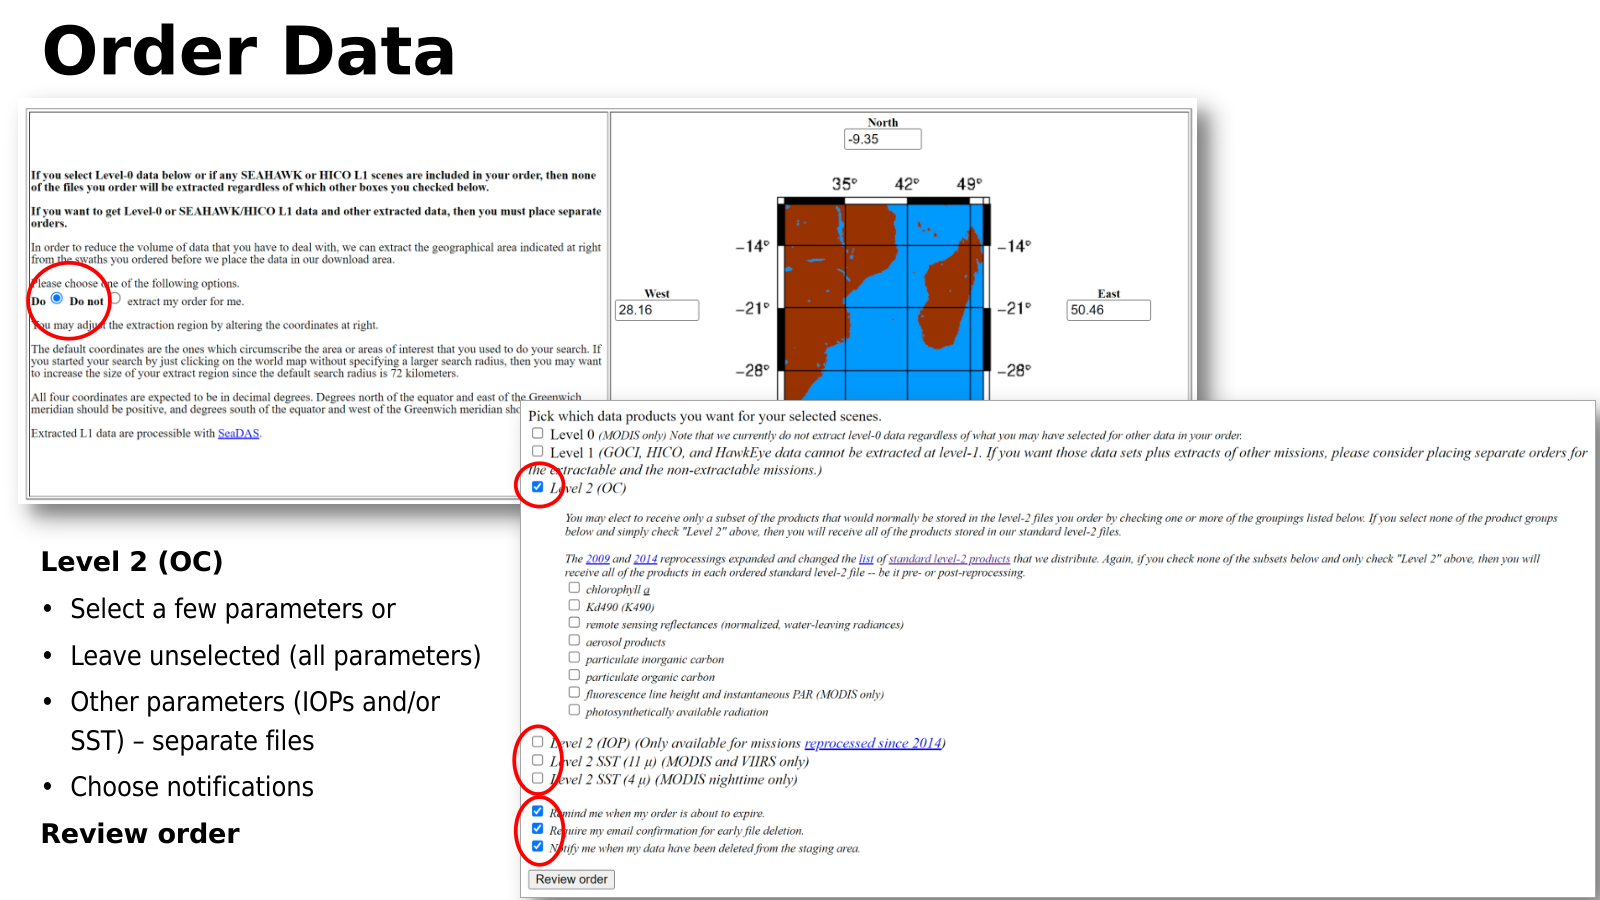
We can then proceed to order the results of our search. We click the “Order Data” to order the results of this search. Note that the order data button will prompt the Earthdata login, meaning, we need to have valid Earthdata credentials as discussed above. Once order data is pushed, in the next page we select whether we want the data to be extracted or not. Most users will want the data to be extracted. Next are the data products, level 0, 1, or 2. Level 2 includes additional select variables. If only level 2 is selected and the variables are left blank, then all of the variables will be included in the order. We can also select weather to include SST. Finally, the level of email notice can be decided. Once all options are set, we hit the “Review order” (Figure 4.14) to refresh the order based on the refinements made in this page. If everything on the new refresh page is as expected, then we click the “Submit order” button and wait for further instructions from the system.

Fig. 4.14 Data order review.#
The final step after the order review is the “Submit order” button. Submitted orders need to be confirmed prior to their staging. This can be done through email confirmation or on the order manager page. It is possible to see whether the order is pending confirmation, cancelled, completed or being staged. Orders can also be extended if the expiration date is reached prior to a complete download.
The status of the order allows one to monitor the different stages of the order
from pending, to scheduled, to staged depending on whether the order is awaiting
a confirmation, has been confirmed, or the staging has been completed. Once the
staging is completed, the manifest file can be downloaded and passed to Wget
for download as discussed in the Section 4.7.3 above.
4.7.5. Earthdata Search Tool#
4.7.6. CMR search#
The OB.DAAC used to host and distribute most of NASA’s OC data. As discussed in the OB.DAAC homepage, a significant amount of their data are now hosted in the EOSDIS Earthdata Search tool. Similar to the search options discussed above, data can be discovered using this tool but Earthdata credentials are necessary to download the data. This tool is part of NASA’s Common Metadata Repository (CMR) – a high-performance, high-quality, continuously evolving metadata system that catalogues all data and service metadata records for NASA’s Earth Observing System Data and Information System (EOSDIS) system and not just the OB.DAAC data. This means with a single Earthdata user account we get access to the vast repository of NASA’s EO data. While the Earthdata Search Tool provides a browser interface, we found the CLI to offer a powerful way to quickly search and find the information one requires.
The documentation about CMR and UMM (Unified
Metadata Model) is extensive and finding the right information at first can be a
daunting experience. So here we briefly introduce the concepts most relevant to
obtaining OC data. The UMM is used as a bridge to map between each of the
CMR-supported metadata standards. A number of different objects require
descriptive metadata that is modelled using a corresponding UMM profile. For
example, a collection (or dataset level) object is modelled using the UMM-C
(Collection) profile, and granule (or file level) objects are modelled using the
UMM-G (Granule) profile. The term concept-id can be associated with both a
collection or a granule and we can search the data based on that information. We
find the concept-id along with a data provider option to be a powerful and
quick way to search and retrieve data.
To find collections from the OB.DAAC with processing level 2 that contain granules we can issue the command:
url = 'https://cmr.earthdata.nasa.gov/search/collections.umm_json'
params = {
    'provider': 'OB_DAAC',
    'has_granules': 'true',
    'processing_level_id': 2
}
r = requests.post(url, params=params)
r.json()
{'hits': 397, 'took': 328, 'items': {...}}
